PLEASE NOTE: Adobe Acrobat Reader is required to open files. Download for free.
Product Literature
Mounting Instructions
Mounting instruction sheets and individual product brochures are listed under the heading for their corresponding category.
"2x2 +" includes the G Series -G2, G3, G4- and Side Placement for Case IH
Product Information
Mounting Instructions
NEW STYLE/KITS PARTS for G SERIES
- G2 G3 G4 on 4LC
- G2 G3 G4 on OEM/Planters
- G2 G3 G4 on Great Plains
- G2 G3 G4 on Horsch Maestro
- G2 G3 G4 on John Deere
- G2 G3 G4 on Kinze
- G2 G3 G4 on Monosem
- G2 G3 G4 on White 6000-8000
- G2 G3 G4 on White 9000
- G2 G3 G4 on Yetter
- Stop Plates for G2 G3 G4
- G4 Closing Wheels on 4LC
- G4 Closing Wheels on OEM/Planters
- G3 Closing Wheels
- G4 Fertilizer Kit
- G4 No-Fertilizer Kit
OLD STYLE/KITS G2 & G4 FERTILIZER DISC
INJECTOR ORIFICE
Rate chart based on:
- Water (8.34 lb/gal)
- 10-34-0 and 3-18-18 fertilizer (11.7 lb/gal)
- 28-0-0 fertilizer (10.67 lb/gal)
- 32-0-0 and 9-18-9 fertilizer (11.04 lb/gal)
- 5-5-5 fertilizer (11.4 lb/gal)
- 8-19-3 fertilizer (10.5 lb/gal)
Injector orifice charts calculated for 30″ rows
OLD STYLE/KITS G3 WALKING BEAM
STALK DEFLECTOR
- G2/G3/G4 Stalk Deflector: JD 1700
- G2/G3/G4 Stalk Deflector: JD 7000/7100/7200/7300
- G2/G3/G4 Stalk Deflector: Kinze
G1 FERTILIZER DISC
"4 Link Closer +" includes the 4 Link Closer, 4 Link Force, and Y-Cam closing systems
Product Information
Mounting Instructions
Y-CAM CLOSING SYSTEM
"Closing Wheels +" includes Mohawk, Zipper, Chicken Tracker, and Furrow V Closer
Product Information
Mounting Instructions
CLOSING WHEELS
- Cast Wheels: Case IH 500
- Cast Wheels: Eccentric Bolt for Case IH 500
- Cast Wheels: John Deere drills
- Chicken Tracker: Case IH planters
- Chicken Tracker: JD drills & older White
- Chicken Tracker: JD, Kinze & White
- Chicken Tracker: White 5000 & 6000S
- Mohawk ring
- Mohawk wheel
- Mohawk/Zipper Troubleshooting:
Setting the Wheel Distance - Zipper
- Zipper Ring
- Mohawk & Zipper Wheel Assembly
G3 WALKING BEAM ARM
Please see 2×2 Side Placement section
FURROW V CLOSER
- Allis Chalmers 78-79
- Case IH 400-500
- Case IH 800+
- Case IH 800+ with fertilizer disc & extended arms
- Case IH 800+ replacement bracket
- John Deere
- John Deere 1700
- John Deere 71 Flex
- Kinze
- Kinze 2000 & 3000
- Monosem
- White 5000
- White 6000 A
- White 6000 S
- White 6000 Insecticide Bander
- White 8000 A
- Universal
- Yetter
Assembling the Mohawk
Assembling the Zipper
"Equipment +" includes instructions and brochures on cultivators, drills, scrapers, planters, and guidance systems
Brochures
GUIDANCE SYSTEMS
Mounting Instructions
CULTIVATORS
"In-Furrow Optional Fittings +" includes Y-Not, Straight Shot, Hose Holder, stainless steel tubes, and John Deere drill options
Product Information
Mounting Instructions
Y-NOT SPLIT-IT
"Pump Systems +" includes fertilizer application systems, Dosatron, and application rate charts
Product Information
Mounting Instructions
Application Rate Charts
INJECTOR ORIFICE
Chart based on:
- Water (8.34 lb/gal)
- 10-34-0 and 3-18-18 fertilizer (11.7 lb/gal)
- 28-0-0 fertilizer (10.67 lb/gal)
- 32-0-0 and 9-18-9 fertilizer (11.04 lb/gal)
- 5-5-5 fertilizer (11.4 lb/gal)
- 8-19-3 fertilizer (10.5 lb/gal)
Injector orifice charts calculated for 30″ rows
"Rebounders +" includes all planter and drill models, and Case IH seed boot information
Mounting Instructions
PLANTER MODELS
- Allis Chalmers 78/79 Air
- Allis Chalmers 71/74/333
- Buffalo 4500
- Buffalo 7000/8000
- NEW! BullsEye® Seed Tube
- Case IH 56
- Case IH 400/500 Cast Seed Boot
- Case IH 800/900/950/955
- Case IH 1200
- Case IH 1200 with NEW seed boot
- Case IH 1200 with Shoup seed boot
- Case IH 1200 with SpeedTube™
- Case IH 2100
- Case IH with Acra Plant Boots
- Case IH with Acra Plant Runner Openers
- Duetz/Allis 385
- Firmer Replacement: Quick Attach
- Firmer Replacement: Universal
- Great Plains
- Great Plains Clear-Shot® Seed Tube
- JD 7000/7100/7200/7300 & 1700 Series
- JD 71 Flex
- NEW! JD ExactEmerge
- JD Seed Tube with Raised Area
- JD Straight Seed Tube
- JD Wide Based Seed Tube
- Kinze 2000/3000 Series & older
- NEW! Kinze EdgeVac® Seed Tube
- Landoll 4400
- Monosem
- Vansco Seed Tube
- NEW! WaveVision® Sensor Seed Tube
- White 5000 with Acra Plant Boot
- White 5000/6000/8000 Series
- NEW! White 9000 Series
- White 9000 (original long slotted)
- Yetter
DRILL MODELS
- Best 1995&Prior
- Case IH 500
- Case IH 5100/5300/5400/5500
- Case IH Soybean Special (15″ space)
- Case IH SDX 30
- Crustbuster 3400/3700/4000 Series
- Crustbuster with Dry Fertilizer
- Crustbuster 3312
- Esch
- FSO Opener Flexicoil
- Great Plains Precision Opener
- Great Plains Solid & No-till
- Haybuster
- Helpful Hints for Drills
- Hiniker 4800
- JD 750/1560-90/1690/1860-90/1990
- JD 750-1990 with Press Wheel Stop
- JD 1560/1860 2 Piece Boot
- JD 455/515/1520/8300
- Krause 5200/5250/5500
- Krause 5400
- Landoll 5500
- Marliss 1996 & newer
- Marliss & Sukup
- Marliss prior to Sukup
- Montezuma
- New Holland 2080/2085
- Salford
- Sunflower 9000
- Tye
- Tye Soybean Rice
- UFT Heavy Duty 5200
- UFT Standard
DO-IT YOURSELF
Case IH Seed Boots

Mounting OIH12N Rebounder to newer 1200 series Case IH seedboots
"Wheel Scrapers +" includes machined gauge arm, gauge and press wheel scrapers
Product Information
Mounting Instructions
GAUGE WHEEL SCRAPERS
PRESS WHEEL SCRAPERS
Video for John Deere, Kinze, and White planters
"Other +" includes B-TOEM disc opener blades, gauge wheel parts, Ferti-Placer, and all other miscellaneous products
Product Information
Mounting Instructions
GAUGE WHEELS & PARTS
FERTI-PLACER
We have replacement parts for the Ferti-Placer. The Ferti-Placer is for older John Deere, Kinze, White, and Case IH planters.
Tips, Troubleshooting, & Precision Adjustments
For Your Planter, Drill, and Attachments
Years of experience in the field has led Schaffert Mfg. to recommend procedures for setting and adjusting your equipment to ensure that it runs at maximum performance.
For complete troubleshooting guides, please refer to the following links:
Precision Precision Precision—The Key to Success
Why is it so important?
At just 5 miles per hour, a planter on 30″ rows, planting 30,000 seeds per acre, must meter a kernel of seed corn approximately every 1/13 of a second – from every meter on the planter. That’s like bullets coming out of a machine gun.
Worn or improper adjusted seed meters can have a devastating effect on seed spacing and seed placement in the seed V. This ultimately affects your bottom line later in the season.
In order to avoid this, it is essential that you have your seed meters checked by a reputable dealer or Ag consultant. This will need to be done every year and be sure you replace or repair when necessary.
Precision planter settings are very important and can not be underestimated. Planter, drills, and air seeders have to cut and handle residue, penetrate the soil to the desired seeding depth, establish proper seed to soil contact, and close the seed V properly. These 4 areas of a planter or drill are important to evaluate, to adjust, and change so you can always have a successful planting season.
Check the ability of your planter or drill to accomplish these tasks:
- Cut and handle residue
- Penetrate the soil to the desired seeding depth
- Establish proper seed to soil contact
- Properly close the seed V

Shoot for even emergence
The average ear size for corn is 800 kernals per ear and 16 rows around (50 kernals per row). If corn plants vary in emergence, up to 72 hours can affect number of kernals and number of rows around.
Example: If you drop 2 rows of kernals you lose 100 total kernals of corn per ear. Why not use the Rebounder for a uniform emergence?
3 Point, 2 Point, & Pull Type Planters
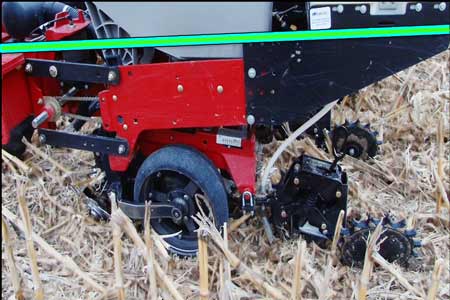
It is important to take notice of the angle of your planter’s row units:
- By nosing planter down in the front, seeds will not be placed properly in the seed V as the seed tube angles out and back too far.
- Worn parallel link bushings on planter units cause planter to run nose down in front, even with the bar set level. An eighth of an inch wear on bushings can equal close to an inch difference on the back of the planter.
- Positioning planter units down in the back makes the seed tubes more straight up and down, while also reducing the amount of pressure needed for the press wheels to close the seed V better.
EXAMPLE 1

- 3 point set so bar is level;
Pull type planters set bar level - Full down pressure on press wheels
- Planter is running nose down
- Press wheels are not closing the seed furrow
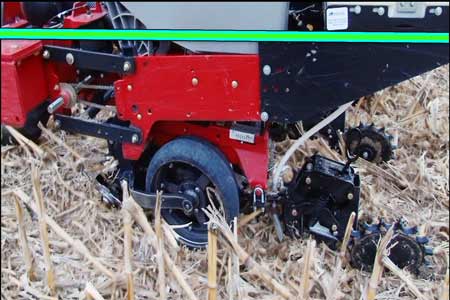
EXAMPLE 2

- 3rd link adjusted back 2 rounds from level bar; Adjust hitch up on pull type planters
- Full down pressure on press wheels
- Planter units running more level; bar down a little in back
- Press wheels closing the furrow better
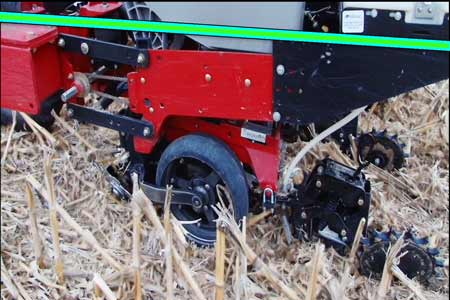
EXAMPLE 3

- 3rd link adjusted back 4 rounds from level bar
- Reduced pressure on press wheels to 2nd notch
- Planter units down some in the back
- Press wheels closing seed furrow the best
**NOTE: The photos depicted are of a Case IH 3 point hitch planter. These suggestions apply to any make and model of 3 point, 2 point, or pull type planter.
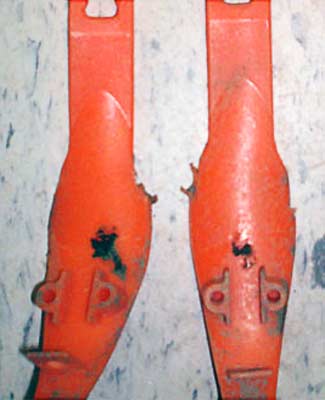
What NOT to do with your Rebounders

